 |
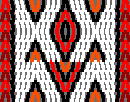
The Woven Piece
Here you see the result of your work. You can grow the woven piece, you can shrink
it, you can start over. You can color it in different ways, and you
can redesign it entirely.
|
|
|
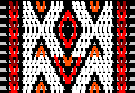 |
How to Make the Weft Visible
You can make the weft visible by clicking on the woven piece.
Click on it again, and the weft disappears.
Combine this feature with invisible threads and you can model the "Missed Hole Technique".
|
|
|
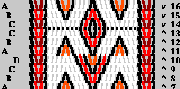 |
Info Mode
You can make the reversal points, the turn direction, letters, and row numbers visible by clicking
on the grey area left or right of the woven piece.
Click here again, and you'll turn it off.
You need to be aware of the dynamics of card weaving. The letters A, B, C, and D
do no longer correspond to the threading of your cards after you have flipped individual cards.
|
|
|
 |
Threading of Cards
The row of / and \ represent cards and how they are threaded:
\ stands for S threading,
/ stands for Z threading.
Cards can be flipped by clicking on a / or \ in this row.
A small square on top shows the color of the top row and changes as you go along. |
|
|

|
Buttons
Buttons are used for most user interaction. Their functions are explained next. |
The Warp Design Screen
The warp design screen lets you view and change the warp. It shows the
S and Z threading direction for each card and the color of threads for
each hole for each card and the weft. In addition there are some informational
text fields. The fields in this screen from top to bottom are:
Title

You can change the title here. The change is displayed in the weaving screen
when you click "Apply" and return to the weaving screen.
Warp
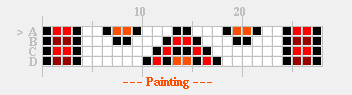
This matrix is the major portion of the design. The arrow on the left
indicates the current top row. Rows are named A, B, C, and D and
correspond to the info of the weaving screen.
The keywords
"Painting", "Adding" or "Deleting" underneath the matrix show the
current mode. In the case of "Painting", the word is painted in the current color.
Threading

No matter what mode you are in, clicking on a / or \ will change the
orientation. Note however, the cards are not flipped which means the
color sequence of the corresponding squares in the matrix does not
change. This is different (but not so visible) in the weaving screen.
Palette

To choose a color for painting you can either select a color from the given palette or you
can modify a color. There are several pieces of information for each color:
- - color icon
- This is the colored rectangle.
- - a framing rectangle
- Exactly one color has a black frame. The frame identifies this color as the current selection.
- - red vs black numbers
- Colors that are used in the design are identified by a red number. The weft has a color just like the warp and as such
has a red number. Most examples have a light grey weft.
- - a number under the color icon
- The number under the icon is the width of the yarn which is typically the number 1.
You can change the width if you perform the following two steps:
- Step 1: click on a color icon to select it.
- Step 2: click again on the same color icon.
- If you clicked in the upper half of the color icon you
increased the width of the yarn. The number underneath the color icon reflects that change.
If you clicked in the lower half of the color icon you decreased the width.
For the current card weaving program only two cases are of interest: 1 and 0.
The value 1 is the normal case. For the value 0 you get an invisible thread
which lets you model the "Missed Hole Technique".
Number of Holes, Number of Cards

This version of the tool supports cards with 3 or more holes. These fields will be editable in the future.
Buttons

Clicking a button puts you into certain modes or trigger actions. Their functions are explained next.
Buttons and their Functions
 |
Puts you in "Painting" mode. If you now click on a square in the design matrix you
will paint it using the current color. |
 |
Puts you in "Adding" mode. If you click
on a square in the matrix you are going to duplicate the card that contains the square.
|
 |
The opposite of adding, clicking deletes a card. |
 |
Pops up the color editor. |
 |
Applies the new warp design to weaving. It takes down the design
screen, and updates the weaving screen. If you have added or deleted
cards the weaving will not immediately reflect those changes. For this
case it is recommended to click on "Start Over" and then develop a
pattern with the new design.
|
 |
Cancels the warp
modifications and takes you back to the weaving screen. |
The Color Editor
The color editor lets you change any color on the palette. The
selected color shows up in the field labeled "Old".
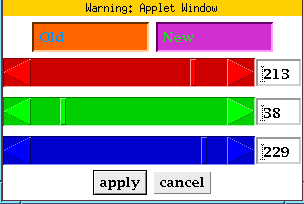
The new color can be created by sliding each one of the sliders, or by
entering numbers in the fields on the right hand side of the sliders. The
numbers need to be between 0 and 255. They represent the red, green, or
blue component of the new color.